Introduction:
The iOS platform powers apps built for the iPhone and iPad. To develop an app for the iPhone or iPad, you need to use Swift as a coding language and the Cocoa framework. You need to use an IDE (Integrated Development Environment) called Xcode.
Here we will discuss iOS app development using Swift language. Swift is far ahead of the other programming languages used for iOS development. It has all the modern programming language capabilities a developer could ask for. Swift is designed to work with Apple’s Cocoa and Cocoa Touch frameworks and the large body of extant Objective-C (ObjC) code written for Apple products. Apple made the developer’s lives quite easy with Swift by adding functionality to support Objective C in Swift. The new Swift programming language is a new way of building iOS mobile apps for iPhones. Swift is Apple’s language, a high-level language that has made programming for iOS more approachable than Objective-C.
Let’s get started with iOS mobile development, using Xcode 11.3 and Swift 5.1. It is very simple to create an iOS app, you only need very basic knowledge of coding.
Build Your First iOS App:
We will build our first app with the Hello World program.
It just shows a “Click Me” button. When a user taps the button, the app shows a welcome message “Hello World”. It helps you to start your journey towards iOS app development.
Just follow the steps below and you can build your first app.
Let’s Jump Into the Project
Step 1:
First, open Xcode. Once it launched, Xcode displays a welcome dialog. From here, choose “Create a new Xcode project” to start a new project.
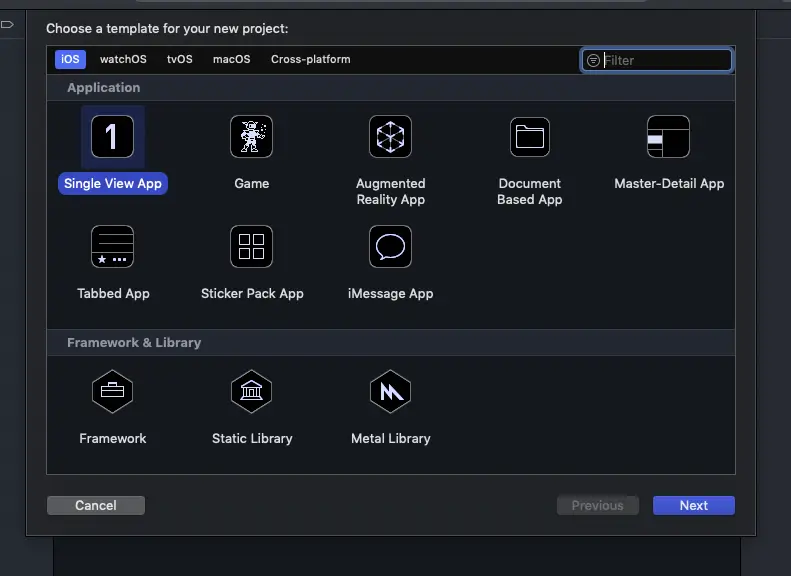
Step 2:
Xcode shows various project templates for selection. Choose iOS > Single View Application and click Next.
Step 3:
This brings you to the next screen to fill in all the necessary options for your project.
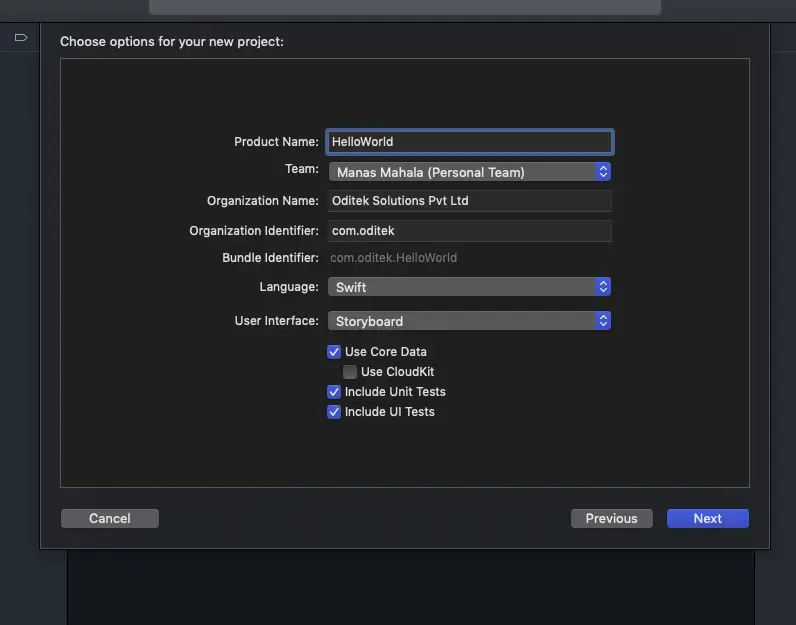
Just fill in the options as described below:
Product Name: HelloWorld – This is the name of your app.
Team: Just leave it as it is. No need to set this.
Organization Name: It’s the name of your organization.
Organization Identifier: It is the domain name written in another way. If you have any domain, you can use your domain name. Otherwise, you may use “com.”. For instance, your name is John. Then fill in the organization identifier as “com.john”.
Bundle Identifier: It’s a unique identifier of your app, which is used during app submission. You do not need to fill in this option. Xcode automatically generates it for you.
Language: Swift – Xcode supports both Objective-C and Swift for app development. As it is all about Swift, we’ll use Swift to develop the project.
Click “Next” to continue. Xcode then asks you where to save the project. Pick any folder on your Mac and then click “Create” to continue.
Step 4:
After you confirm, Xcode automatically creates the “Hello World” project.
Step 5:
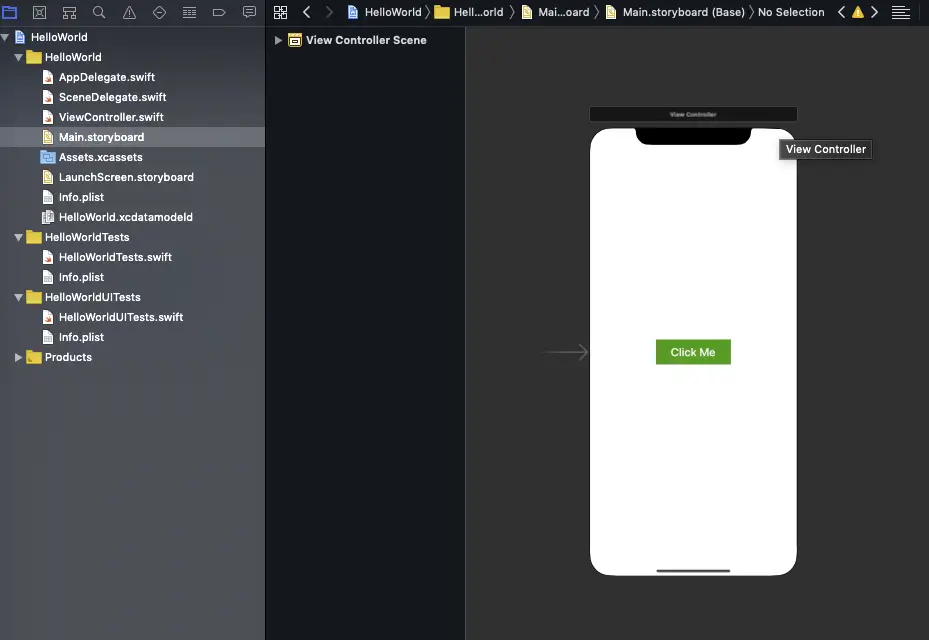
Select Main.storyboard, which is the file for storing user interface, Xcode shows you the visual editor for the storyboard.
Just drag and drop the button object to the view. From the Attribute Inspector change the name to “Click Me”.
Now, we’ll need to add a few lines of code to display the “Hello World” message.
Step 6:
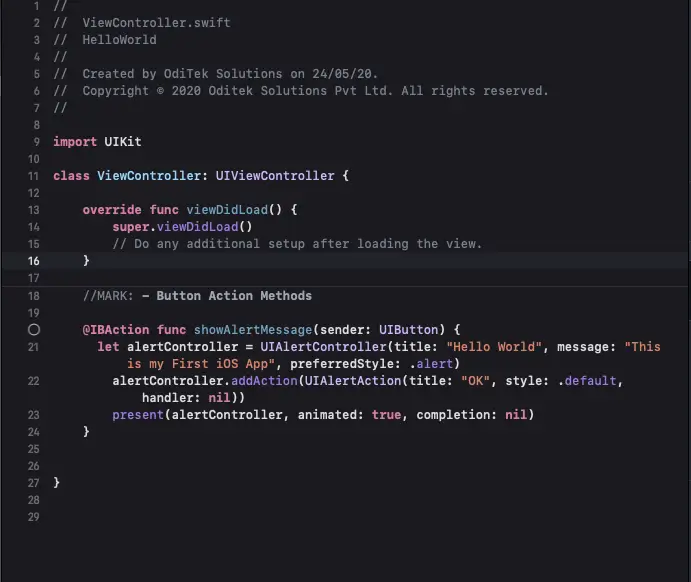
Select the ViewController.swift file and the editor area immediately displays the source code. Just type the below code in your ViewController class:
@IBAction func showAlertMessage(sender: UIButton)
{
let alertController = UIAlertController(title: “Hello World”, message: “This is my First iOS App”, preferredStyle: .alert)
alertController.addAction(UIAlertAction(title: “OK”, style: .default, handler: nil))
present(alertController, animated: true, completion: nil)
}
Your source code should look like this after editing:
Step 7:
Now connect the User Interface with the code.
Select Main.storyboard to view your Interface Builder. Now press and hold the control key, click the “Click Me” button, and drag it to the View Controller icon. Release both buttons (mouse + keyboard) and a pop-up shows the showAlertMessageWithSender: option under Sent Events. Select it to make a connection between your button and showAlertMessageWithSender: action.
Step 8: Test Your App
That’s it! Now you can test your first app. Just press the Run button. If everything is correct then your app should run properly. The app displays a message when you tap the “Click Me” button.

Advantages of development on iOS Swift over Objective C
1. Readability
The main advantage of choosing Swift is its clean syntax, which makes it easier to read and write. The number of code lines needed to implement an option on Swift is a lot fewer than for Objective-C. It eliminates many legacy conventions, such as semicolons(;) to end lines or parentheses that surround conditional expressions inside if/else statements. Another major change is that method calls do not sit inside each other resulting in a bracket mess. Swift uses the comma-separated list of parameters within parentheses for method or function calls. As a result, the code is cleaner with a simplified syntax.
Swift code more closely resembles plain English, which makes writing code more natural while enabling developers to spend far less time looking for problematic code.
2. Open-Source
In the year 2015 Swift was announced open-source. It means that Apple will be able to get feedback from the community and make improvements consistently as independent developers contribute to the success of the language.
3. Maintenance
Objective-C can’t evolve without C. Contrarily, Swift does not have these dependencies, which makes it a lot easier to maintain.
Swift, however, drops this two-file requirement, combining the Objective-C header (.h) and implementation files (.m) into a single code file (.swift). In Objective-C, programmers have to manually synchronize method names and comments between the files. But with Swift, you can spend more time creating app logic and improving the quality of their code, comments, and features that are supported.
4. Less Code & Less Legacy
In Objective-C, there are a lot of issues that cause app crashes. But Swift provides the code that is less error-prone because of its inline support for manipulating text strings and data. Additionally, classes aren’t divided into two parts; the interface and the implementation. This cuts the number of files in the project in half, which makes it much easier to handle.
5. Safer Platform
In the competitive mobile app marketplace, developing a secure app should be a priority. Swift’s language and syntax constructions eliminate the several types of mistakes possible in Objective-C. This stability means that there will be fewer crashes and cases of problematic behavior. It doesn’t prevent programmers from writing bad code but rather makes it less likely to make mistakes. This adds an extra layer of quality control during development.
6. Speed
Swift also provides various speed advantages during development which saves your time and cost. For a sort program will run 3.9x faster than Objective-C.
7. Swift Supports Dynamic Libraries
Dynamic libraries are the executable piece of code that can be linked to an app. This feature allows current Swift apps to link with newer versions of the Swift language as it evolves. In Swift dynamic libraries are directly uploaded to the memory, eliminating the initial size of the app and increasing app performance.
If you require any further information on iOS app development with Swift,drop us an email us at info@oditeksolutions.com.