Web Real-Time Communications (WebRTC) is an open-source project created by Google to enable peer-to-peer communication in web browsers and mobile applications through application programming interfaces. This includes audio, video, and data transfers. React Native is a framework created by Facebook for easy cross-platform app development. For React-Native WebRTC Developers the WebRTC solutions have historically had a high barrier of entry. Expo has not yet (as of May 2020) integrated the react-native-webrtc native module into their framework despite having demand for it. Of course, it is not Expo’s responsibility to implement the things that we claim for, that is not how open-source works.
If you want to have WebRTC on your React-Native project you must go with the official npx react-native CLI.
Installation
1. iOS
2. Android
Usage
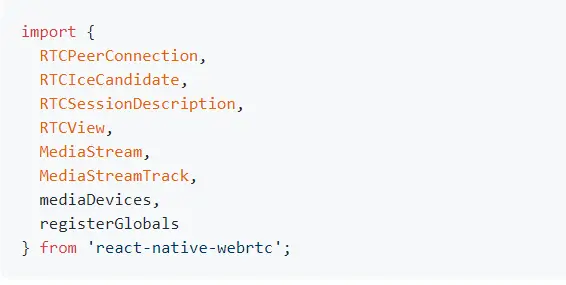
Now, you can use WebRTC in React Native in the browser. In your index.ios.js/index.android.js, you require WebRTC to import RTCPeerConnection, RTCSessionDescription, etc.

iOS Setup
iOS integration is a simple one because cocoapods will do most of the legwork. On the project’s root, locate the podfile under ./ios/podfile, the first line is where we set the platform version, we will change this to version 10: platform: ios, ‘10.0.’
On the podfile, locate your project’s target pods and add the following line:
pod ‘react-native-webrtc’, :path => ‘../node_modules/react-native-webrtc.’
Once you’ve made these changes save everything and open a terminal on your project’s root and run npx pod-install.
Now that you’ve completed the first step, it’s time to ask (nicely) for some permissions, locate the info.plist file under ./ios/myApp and add the following lines after the first
This completes the iOS setup portion. If you only work for the iOS platform, then all you need to do now is to run the project on an iPhone.
Android Setup
The setup process for Android is more complex but we will try to keep it as simple as possible.
On the project’s root, locate gradle settings under ./android/settings.gradle and replace the last line with the following:
include ‘: WebRTCModule’, ‘:app’
project(‘:WebRTCModule’).projectDir = new File(rootProject.projectDir, ‘../node_modules/react-native-webrtc/android’)
Locate the project’s gradle properties under ./android/gradle.properties and add the following line:
android.enableDexingArtifactTransform.desugaring=false
Locate Android’s build properties under ./android/build.gradle and look for the build script dependencies, make sure the tooling is on version 3.5.2:
classpath(“com.android.tools.build:gradle:3.5.2”)
On different build properties located under ./android/app/build.gradle locate the dependencies and add the following line within its scope:
compile project(‘:WebRTCModule’)
Go into the project’s Android MainApplication.java located at ./android/app/src/java/com/all/the/things/ and add the namespace for react-native-webrtc by adding the following import:
import com.oney.WebRTCModule.WebRTCModulePackage;
Then add the permissions on AndroidManifest.xml under ./android/app/src/main and the same scope as the
<uses-permission android:name=”android.permission.INTERNET” />
<uses-permission android:name=”android.permission.ACCESS_NETWORK_STATE”/>
<uses-permission android:name=”android.permission.MODIFY_AUDIO_SETTINGS” />
<uses-permission android:name=”android.permission.RECORD_AUDIO” />
<uses-permission android:name=”android.permission.WAKE_LOCK” />
<uses-permission android:name=”android.permission.WRITE_EXTERNAL_STORAGE”/>
<uses-permission android:name=”android.permission.CAMERA” />
<uses-feature android:name=”android.hardware.camera” />
<uses-feature android:name=”android.hardware.camera.autofocus”/>
That completes the Android setup portion. You need to do now is to run the project on an Android phone.
Community
Everyone is welcome to the Discourse community to discuss any React Native and WebRTC related topics and React Native WebRTC examples.
Community URL: https://react-native-webrtc.discourse.group/
CONCLUSION
So basically all you need to do is to start WebRTC implementation on your React Native application today. If you can handle the uncertainty that comes with working with new technology, and want to develop React Native mobile applications with WebRTC in React Native, then you should go for this.


