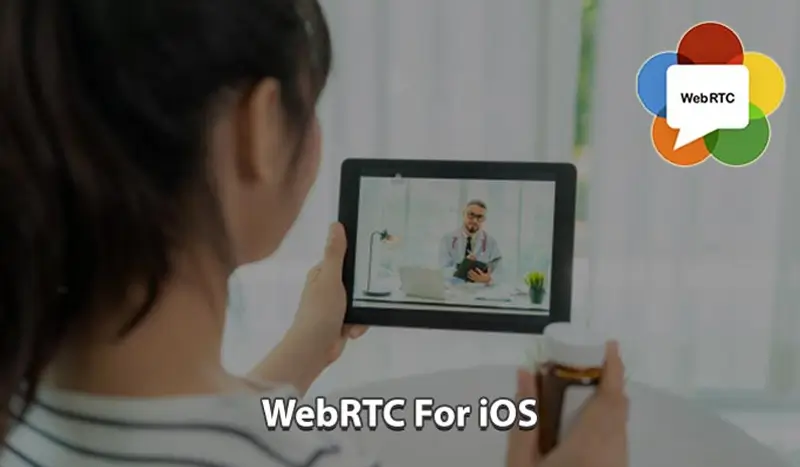
WebRTC is a special network protocol that stands for Real-Time Web Communication. WebRTC is an open-source toolkit for real-time multimedia communication working in an application. It supports audio and video chat and exchange data between the clients. To use WebRTC in iOS, you don’t need extra plugins, extensions, or other external add-ons. The end-users should not use the same client module to interact with each other. With this standard, you can turn your host into a video conferencing endpoint. Thanks to the direct connection, WebRTC doesn’t need registration or any third-party accounts. WebRTC for iOS was created to quickly transmit and protect confidential information using local network streams (organizing network meetings, remote conferences, etc). It is a rather new technology and the development is still in progress. Yet, even now, WebRTC on iOS is convenient to use.
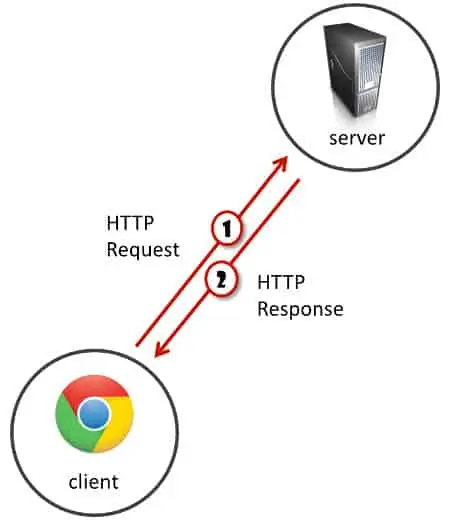
You have the browser as a client. It connects to the server to ask for stuff. Let’s call these things requests. And the server obliged by sending responses. We’ve grown beyond that using WebSockets, but it still is rather the same. If I want to send a message to a friend who is looking at his browser just now, the message needs to go to the server and from there to my friend. Much like the post office works.
WebRTC is where browsers and HTML diverges from this paradigm:
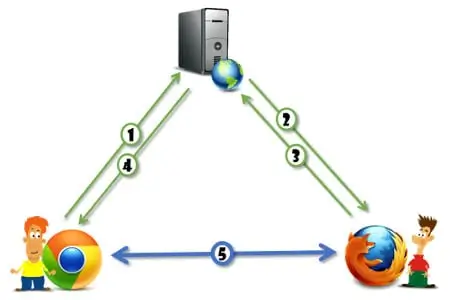
Uses of WebRTC
WebRTC in iOS is used for handling audio and video chats. The technology is in the process of improvement, and its scope is expanding. Today, various web services use it in their work including Facebook, Google Hangouts, Skype, as well as some sites, and CRM systems. By installing WebRTC in your meeting room, you will make it available to any of your employees or clients. They can connect to a full-fledged video conferencing from the app on any device. This will allow you to handle a meeting or an online consulting session. You can place an access link to the conference on your website for everyone in your user’s account. It will organize audio-video consultation and support for your customers. They can set up a video conference with you in one click.
Working of WebRTC
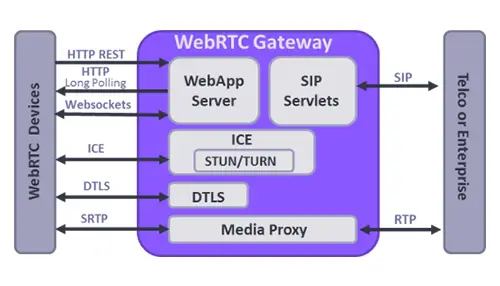
WebRTC in iOS sends an SDP Offer to the client JS app to send it to another device using that to generate an SDP Answer. SDP stands for a Session Description protocol. It describes media communication sessions. It doesn’t deliver any media but the endpoints use it to agree on the type of media, format, and other properties. The trick is that the SDP includes ICE candidates. ICE helps to connect two hosts using NAT. To do this, it opens the ports and maintains the connection via them. If the client failed to establish the connection or it is not working properly, there is an option to use a TURN server for handling all traffic. To ensure stable performance, we recommend you to create your TURN/STUN server for working with WebRTC. Once done, the encoding process starts and the data streaming between the clients and the server begins. If they talk directly, they can open a DTLS connection and use it to connect SRTP-DTLS media streams and send DataChannels via DTLS. To exchange data between two participants, the video server is not required. If you want to connect several participants in one conferencing, you will need a server.
Benefits of WebRTC
Today, WebRTC is available for Chrome, Firefox, Safari, and Edge browsers. They also provide SDKs for development on the different mobile platforms that are constantly updated. You can use WebRTC for many tasks, but its primary function is a real-time P2P audio and video chat. It is based on JavaScript, different APIs, and HTML5 and works right in the app. WebRTC makes it possible for clients to transfer audio, video, and other data. To communicate with another person, each WebRTC client must agree to start the connection, know how to locate one another, bypass security and firewall protection, and send all multimedia information in real-time.
1. Cross-Platform Ready: Any client that supports WebRTC can connect to another WebRTC device or the media server and enable voice or video chat. The operating system of the device doesn’t matter. This is possible and thanks to implementing W3C standard and IETF protocols.
2. Secured by HTTPS and SRTP: You can easily protect your WebRTC voice and video calls with an encryption protocol. Secure RTP (SRTP) encrypts the data that is especially important for protecting the confidentiality of your information. This prevents the interception and recording of voice and video.
3. High Communication Quality: To ensure the best communication quality, WebRTC uses a wide selection of codecs that are compatible with all applications. Here are some of them:
i. Opus is a scalable and flexible codec based on Skype SILK technology and used for dealing with audio with different degrees of complexity. It supports stereo signals and encoding from 6 kbit/s to 510 kbit/s without complicating the de-multiplexing process.
ii. iSAC and ILBS are open-source codecs designed for voice transmission used in many streaming audio applications. They are not mandatory and some browsers may not support them.
iii. VP8 is a mandatory video compression technology supported by all browsers. VP8 allows video with an alpha channel allowing the video to play with the background through the video to a degree specified by each pixel’s alpha component.
iv. VP9 supports deeper color, a full range of subsampling modes, and several HDR implementations. You may customize frame rates, aspect ratios, and frame sizes.
All the protocols support data compression, so you can handle a call with your partner even if the internet connection is not speedy.
4. Quality automatically adjusts to any types of connection: WebRTC supports work behind NAT and establishes a reliable connection between the hosts. It helps to avoid relaying from the server and thereby reduces latency and improves the video quality.
5. Multiple Media Streams: WebRTC can adapt to different network conditions. It regulates the quality of communication, responds to bandwidth availability, detects and prevents congestion. It is possible thanks to multiplexed RTP control protocol (RTCP) and secure closed-loop audio-video profile (SAVPF). The receiving host sends network status information back to the sending one. It analyzes the conditions and responds to the changing ones.
6. Adapts to network conditions: WebRTC supports multi-media and endpoint negotiation. This ensures efficient use of bandwidth, providing the best voice and video chatting. API and signaling can coordinate the size and format for each endpoint individually.
WebRTC API Viewpoint
WebRTC has 3 main API groups:
1. UserMedia
2. PeerConnection
3. Data Chanel
1. UserMedia
getUserMedia is in charge of giving the user access to the camera, microphone, and screen. It alone gives value to those who need to do things locally, without implementing real-time conversations.
Here are a few uses of standalone-getUserMedia:
a. Take a user’s profile picture
b. Collect audio samples and send them to a speech to text engine
c. Record audio and video with no quality degradation due to packet loss
I am sure you can come up with more uses to it.
2. PeerConnection
PeerConnection is at the heart of WebRTC and the most complex to implement and understand. In a way, it does EVERYTHING.
a. It handles all the SDP message exchange (not sending them through the network itself, but generating them and processing the incoming ones).
b. It implements ICE to connect the media channels, going through TURN relays if needed.
c. It encodes and decodes the audio and video data in realtime.
d. It sends and receives the media over the network.
e. It handles network issues by employing and other algorithms that you don’t want to know but eventually will need to learn.
f. It handles local audio issues using algorithms.
Much of what goes on inside peer connection that affects the resulting media quality is based on heuristics. A specific set of arbitrary rules. Different implementations may have different behaviors and different media quality due to this.
3. DataChannel
Data channels can be configured to be reliable or unreliable. If you set them to unreliable then messages will not get automatically re-transmitted on them. Sometimes that would be your preference. They can also be configured to be ordered or unordered in the way they deliver messages.
Data channels were designed to work on the API level similar to WebSocket, so once you open it, you can think about it similarly.
Separation of Signaling and Media
When loading web pages, we are now used to the fact that the browser goes fetching a hundred different resources just to render a web page. These resources can come from various servers – the host of the page, a CDN holding static files, and a few third party sites. That said, this will mostly boil down to three types of files:
1. HTML and CSS, which make up the main content of the site and its style.
2. JS, which is usually there to run the interactive part of the website.
3. Image files and other similar resources.
Signaling takes place over an HTTPS connection or a WebSocket. It is implemented via JS code. What you do in signaling is to decide how the users are going to find each other and start a conversation. One important thing about signaling – it isn’t part of WebRTC itself. The developer is left to decide how to pass the information needed to create a WebRTC session. WebRTC in iOS will generate the bits of information it needs to send and process such bits of information that gets received but it won’t do anything over the network about them. These bits of information are packed into SDP messages by WebRTC today. The actual media goes off on a very different medium and connection. It goes through “media channels”. These use either SRTP (for voice and video) or SCTP (for the data channel). Media takes a different route than signaling over the network and behaves very differently. This is true for the browser, the network, and the servers you need to make it work.
Audio and Video
Audio and video is the main thing you’ll notice with WebRTC. It is also what gets showcased in almost all demos and examples of WebRTC. It is a simple video visual and interactive. Audio and video in WebRTC work by using codes. These are known algorithms that are used to compress and decompress audio and video data. There are different codecs you can use in WebRTC and I won’t get into it now. Audio and video also get interesting because it is sent with low latency in mind. If packets get lost along the way due to network issues – it might not be worth retransmitting them (another first in the HTML). WebRTC uses known VoIP techniques to get media processed and sent through the network, and this is all done over SRTP – the secure and encrypted version of RTP. WebRTC did make some minor changes by using specific mechanisms in SRTP that were not in wide use before making it a bit harder to interoperate with if you have a VoIP service deployed already.
NAT Traversal
Being able to communicate directly across browsers is great, but it doesn’t always work. The internet was built on the client-server paradigm some 30-40 years ago. Since then it has changed somewhat. Today, most users access the internet from behind a firewall or a NAT. These devices usually change the IP address of the user’s device and mask it from the open web. This masking can be just that, or it can also offer some measure of “protection” where unsolicited traffic is not allowed towards the user’s device. The problem with this approach is that WebRTC uses different mediums for signaling and media, so, understanding what’s solicited and what’s unsolicited traffic isn’t easy. Furthermore, some enterprises will make it a point not to let any type of traffic into (or out of) their network without vetting it. This brings us to these types of scenarios:
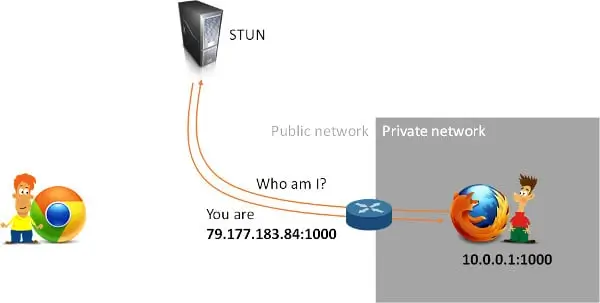
The guy there on the left? He now might know the public IP address of the guy on the right due to that STUN request that was made. But the public IP address might only be opened to the STUN server and having anyone else try to connect through that “pinhole” that was created may still fail. To overcome these issues, a user’s device will not be able to directly communicate with another device located inside some other private network. And the workaround for that is to relay that blocked media through a public server. This is the whole purpose of TURN Servers:
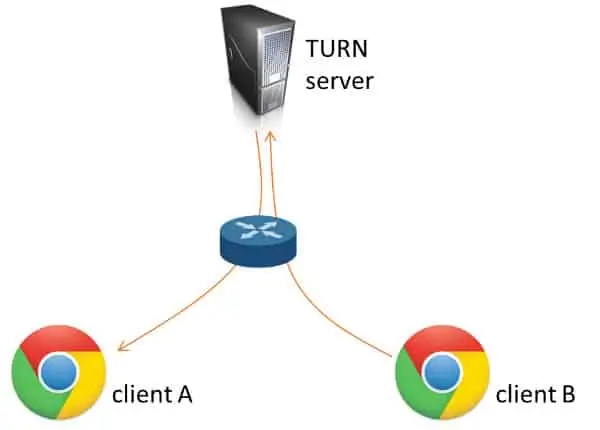
You can expect anywhere between 5-20% of your sessions to require the use of TURN servers. Due to this complication, a WebRTC session takes the following steps:
i. Send out an SDP offer to a web server. This SDP message outlines what are the media channels the device wants to exchange and how to find them.
ii. Receive an SDP answer via the webserver from the other device. Remember that other devices may be a media server.
iii. Initiate a procedure called ICE negotiation, meant to find out if the devices are reachable directly, peer-to-peer, or do they require media relay via TURN. This process is best done using trickle ICE, but that’s for another day.
iv. Once done, media flows directly between the devices.
All this mucking around requires asynchronous programming on the browser using JS code and can be done using JavaScript. On the server-side, you can use whatever you want to manage media and signaling. Oftentimes, developers won’t develop directly against the WebRTC APIs and will use third-party frameworks and modules to do that for open source or commercial.
A Quick Recap of How WebRTC Works
1. WebRTC sends data directly across browsers – P2P.
2. It can send audio, video, or arbitrary data in real-time.
3. It needs to use NAT traversal mechanisms for browsers to reach each other.
4. Sometimes, P2P must go through a relay server (TURN).
5. With WebRTC you need to think about signaling and media. They are separate from one another.
6. P2P is not mandated. It is just possible. You can place media servers if and when you need them. It “breaks” P2P, but we’re looking to solve problems, not write an academic dissertation.
Servers you’ll need in a WebRTC product –
1. Signaling server (either as part of your application server or as a separate entity)
2. STUN/TURN servers (that’s what gets used for NAT traversal)
3. Media servers (optional. Only if your use case calls for it)
Developing WebRTC enabled for iOS
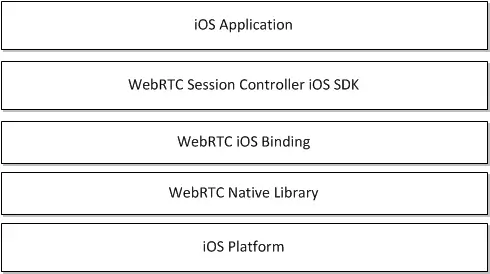
The WebRTC iOS SDK enables you to integrate your iOS applications with core WebRTC Session Controller functions. We can use the iOS SDK to implement as follows:
1. Audio calls between an iOS application and other WebRTC-enabled as Session Initialization Protocol (SIP) endpoint or a Public Switched Telephone Network endpoint using a SIP trunk.
2. Video calls between an iOS application and other WebRTC-enabled application, with video conferencing support.
3. Support for Interactive Connectivity Establishment (ICE) server configuration is included to support Trickle ICE.
4. Transparent session reconnection following network connectivity interruption.
The WebRTC iOS SDK is built upon several additional libraries and modules as follows:
Web RTC start working with Firebase
Use this codelab to build a simple video chat application using the WebRTC API in your browser and Cloud Firestore for signaling. The application is called FirebaseRTC and works as the basics of building WebRTC enabled applications.
1. Create and set up a Firebase project
Create a Firebase project.
1. In the Firebase Console click Add project and name the Firebase project as FirebaseRTC.
2. Remember the Project ID for your Firebase project.
The application that you’re going to build uses two Firebase services available on the web:
1. Cloud Firestore to save structured data on the Cloud and get instant notification when the data is updated.
2. Firebase Hosting is to host and serve your static assets.
For this specific codelab, you’ve already configured Firebase Hosting in the project you’ll be cloning. However, Cloud Firebase requires the configuration and enabling of the services using the Firebase console.
Enable Cloud Firestore
The app uses Cloud Firestore to save chat messages and receive new chat messages.
You’ll need to enable Cloud Firestore:
1. In the Firebase console menu in the Develop section, click Database.
2. Click Create database in the Cloud Firestore panel.
3. Select the Start in test mode then click Enable after reading the disclaimer about the security rules.
The database can freely write during development in test mode. We’ll make our database more secure later on in this codelab.
2. Get the sample code
Clone the GitHub repository. You should see your copy of FirebaseRTC which has been connected to your Firebase project. The app has been connected automatically to your Firebase project.
3. Creating a new room
Each video chat session is called a room. Users can create a new room by clicking a button in their application. This will generate an ID that the remote party can use to join the same room. The ID is used as the key in Cloud Firestore for each room. Each room will contain the RTCSessionDescriptions for both the offer and the answer with two separate collections with ICE candidates from each party.
Your first task is to implement the missing code for creating a new room with the initial offer from the caller. Open public/app.js and find the comment // Add code for creating a room here. The first line creates an RTCSessionDescription that will represent the offer from the caller. This is then set as the local description and finally written to the new room object in Cloud Firestore. Next, we will listen for changes to the database and detect when an answer from the callee has been added. This will wait until the callee writes the RTCSessionDescription for the answer, and set that as the remote description on the caller RTCPeerConnection.
4. Joining a room
The next step is to implement the logic for joining an existing room. The user does this by clicking the Join room button and entering the ID for the room to join. The task is to implement the creation of the RTCSessionDescription for the answer and update the room in the database accordingly.
5. Collect ICE candidates
Before the caller and callee can connect, they also need to exchange ICE candidates that tell WebRTC how to connect to the remote peer. Your next task is to implement the code that listens for ICE candidates and adds them to a collection in the database. Find the function collectIceCandidates. This function does two things. It collects ICE candidates from the WebRTC API and adds them to the database, and listens for added ICE candidates from the remote peer and adds them to its RTCPeerConnection instance. It is important when listening to database changes to filter out anything that isn’t a new addition since we otherwise would have added the same set of ICE candidates over and over again.
CONCLUSION
WebRTC allows communicating to the highest level of reliability and security. This will improve the quality of online meetings, video conferencing, and similar services. Both desktop and mobile-based multi-person multimedia chat applications are achievable by leveraging WebRTC. WebRTC works across browsers and operating systems, including iOS and Android. As an open-source project, many have ported it to their environments as well. Besides a browser supporting WebRTC, you will need to install your signaling server as well as the TURN server. Depending on your use case, you may also need media servers.
